
Embroider Along - Types of Hooped Embroidery Applique
- Bernadette Hoy
- Sep 24, 2021
- 3 min read
Welcome to the first official week of our Embroider Along. This week we will focus on the letters first.
If you have not read the whole of the pattern I ask you to do so now before you start to sew. Your next decisions are
- are you going to do blanket or satin stitch embroidery, or a combination.
- which way are you going to applique.
There are a couple of different ways you can do hooped applique embroidery patterns. I will give you a quick overview here. You can choose which one works best for you. I also discuss how I have hooped. Please read through everything so that you can learn a little more before you start.
Embroidery Options
The first is probably the most traditional way. I would do this if I was using satin stitch around the edges. I would NOT use this method for blanket stitch designs.
As a summary
This method - Cut back – satin stitch
Below - Pre cut – blanket stitch
For this method - Cut Back
You mark the placement in the hoop.
Stitch down the applique fabric.
Remove the hoop carefully from the machine.
Make sure you do NOT remove or disturb the fabric.
Carefully cut the fabric away.
Close but not too close to the stitching line.
Fit the hoop back onto the machine for the next lot of stitching.


Here is a video of how I cut the fabric back.
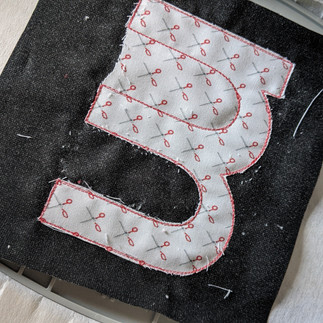
Be careful not to cut too close to the stitching. You can see on the top of the dot of the i below as well as the top of the line of the i, I have cut too closely. It has pulled away from the stitching and not been covered by the satin stitch.

Also because the fabric is loose / floating , ie no applique web (vlisofix / heat n bond) it can move more.
To determine the size of the fabric you use for your lettering it is recommended that you cut it 1/2 to one inch bigger than the shape. Make sure this is all the way around. Use the pattern templates to determine this

The second way ( pre cut) you can do your applique is somewhat like you would out of the hoop.
Trace your shape into reverse on the applique web.
Iron the web to the back of your lettering fabric.
Cut out the letter.
Peel the paper off the back of the letter.
Get to this part of the stitching

Carefully remove the hoop from the machine.
Make sure you do NOT remove or disturb the fabric.
With a mini iron, iron the letter onto the fabric in the hoop, within the lettering stitching.
Reattach the hoop and continue stitching.
This method takes a little longer but gives you much cleaner edges.
Hooping
When you are hooping cut the background pieces as per the pattern. Fold them in half and then quarters. Mark the centres by creasing firmly.
Use your grid to match the centres.
Hoop the tearaway. You may want to use 2 layers if you find your stitching is puckering.
Lay / Float the fabric on the tearaway in the hoop so that when the grid is placed over the fabric it is "square" in the hoop and the centres match.


Floating
If you have a basting stitch on your machine you are recommended to use it. Set it to basting and this will stitch a square / rectangle. See below for visual references.


There are a couple of reasons to do this. The first is to stabilise your background so that you know it is in position. You can also see in advance where your stitching will be and how big to make your applique piece of fabric. The next and equally important is to stabilise the stitching. See below - one basted and one not.

Are you ready? ... Ready Set Go
Start stitching and have fun. Do some test sewing and get comfortable.
Sew all the letters out this week. We will touch base again next week with the next lot of sewing.
With the letter Q you need to note....
We'd love to see what yours look like. Please post up and tag us #mysewingsupplies or @mysewingsupplies
We all choose different colours and that makes it fun when we get to see the work of others.
I will go into the various stiches blanket v satin a little more next week
Happy Sewing
Bernadette


Comments